Hardware Implementation Guide for RiBot
Overview
Once you have a robotic arm like Moveo, Thor, Arctos, or EEZYbotARM MK3, implementing RiBot mainly involves adding the right drivers and using the ESP32 Microcontroller for motor control. Here's a detailed guide on how to do it:
Why the ESP32?
The ESP32 is the preferred microcontroller for several reasons:
- Ease of Access: It's widely available and user-friendly.
- Low Cost: Offers a cost-effective solution for robotic control systems.
- Wireless Capabilities: Comes with onboard WiFi and Bluetooth, allowing for wireless control of the robot arm and eliminating the need for an external computer.
How to Connect the ESP32 to the Motors
Wiring Diagram
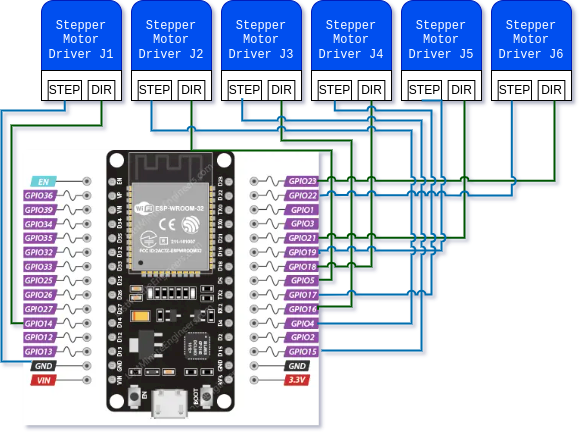
 Wiring Diagram for the ESP32 and Stepper Motors
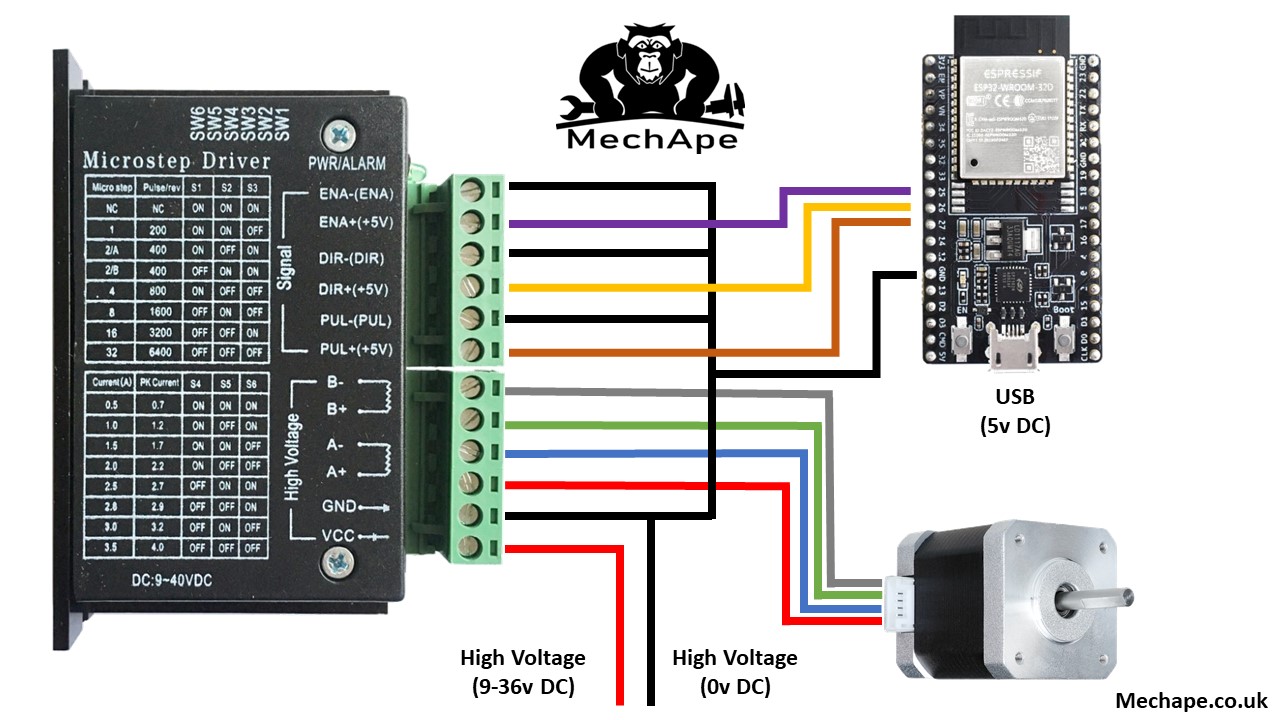
 Example using TB6600 Stepper Motor Driver
The wiring diagram is just an example; you can connect the motors in any way you wish, as long as you use the correct type of pins. Make sure to refer to the ESP32 Pinout Reference to understand which pins are suitable for output (for motors) and input (for sensors).
Configuration in arm_config.toml
After wiring, you'll need to adjust the settings in the arm_config.toml file at the root of the repository to match your hardware setup. This file contains configuration details for each joint of the robot arm, including motor type, pin assignments, and physical parameters.
Here's an overview of the sections in the arm_config.toml file:
-
Joint Configuration: Defines default settings for all joints, such as speed, steps per revolution, homing direction, and more. These can be overridden in individual joint sections.
-
Arm Parameters: Specifies the physical dimensions of the robot arm's joints, crucial for accurate movement and kinematic calculations.
-
Tool Parameters: Configures any tools attached to the arm, including their type and control pin.
-
Individual Joint Sections: Each joint of the robot arm is configured here, specifying details like the motor type, direction and step pins for stepper motors, and endstop settings.
By properly setting up the arm_config.toml file, you ensure that RiBot can accurately control and coordinate the movements of your robot arm, making it suitable for a wide range of applications. Remember, the configuration should reflect your specific hardware setup, so adjustments may be necessary based on the model of the robotic arm and the types of motors and drivers used.
Lets review this file:
title = "Example robot arm configuration"

# These are the default values, if you set them here they will be used for all joints
#  If set again in a joint section, the joint specific value will be used

[joint_configuration]
    speed_rad_per_s = 0.35
    steps_per_rev_motor_axis = 800 # Microstepping
    homing_direction = 1 # 1 or -1
    max_angle_rad = 7.0
    min_angle_rad = -7.0
    conversion_rate_axis_joint = 1.0
    homing_offset_rad = 0.0 # Offset from homing position
    dir_inverted = 1 # 1 or -1

# Physical parameters of the arm
[arm_parameters]
# J1
    a1x= 0
    a1y= 0
    a1z= 0
# J2
    a2x= 0
    a2y= 0
    a2z= 172.48
# J3
    a3x= 0
    a3y= 0
    a3z= 173.5
# J4
    a4x= 126.2
    a4y= 0
    a4z= 0
# J5
    a5x= 64.1
    a5y= 0
    a5z= 0
# J6
    a6x= 169.0
    a6z= 0
    a6y= 0

# Tool parameters
[tool]
    name = "tool"
    [tool.driver]
        type = "servo"
        pin = 27

# Joint configuration
[[joints]]
    name = "joint_1"
    homing_direction = -1 # 1 or -1
    conversion_rate_axis_joint = 9.7 # Gear ratio
    homing_offset_rad = 0.0 # Offset from home position

    speed_rad_per_s = 0.2
    [joints.driver]
        type = "stepper"
        dir_pin = 14
        step_pin = 13

    # [joints.driver]
    #     type = "servo"
    #     pin = 20
    [joints.endstop]
        type = "none" # none, dummy or hall (hall may work with other sensors)
        pin = 26
    # [joints.endstop]
    #     type = "dummy"

[[joints]]
    name = "joint_2"
    homing_direction = 1
    dir_inverted = -1
    conversion_rate_axis_joint = 7.0
    homing_offset_rad = 0.0
    speed_rad_per_s = 0.1
    [joints.driver]
        type = "stepper"
        dir_pin = 5
        step_pin = 4
    [joints.endstop]
        type = "none"
        pin = 25

[[joints]]
    name = "joint_3"
    homing_direction = 1
    conversion_rate_axis_joint = 15.0
    homing_offset_rad = 0.0
    speed_rad_per_s = 0.1
    steps_per_rev_motor_axis = 400 # Microstepping
    [joints.driver]
        type = "stepper"
        dir_pin = 16
        step_pin = 15
    [joints.endstop]
        type = "none"
        pin = 33

[[joints]]
    name = "joint_4"
    homing_direction = 1
    conversion_rate_axis_joint = 5.0
    speed_rad_per_s = 0.3
    homing_offset_rad = 0.0
    dir_inverted = -1
    [joints.driver]
        type = "stepper"
        dir_pin = 18
        step_pin = 17
    [joints.endstop]
        type = "none"
        pin = 32

[[joints]]
    name = "joint_5"
    homing_direction = 1
    conversion_rate_axis_joint = 5.0
    homing_offset_rad = 0.0
    speed_rad_per_s = 0.4
    dir_inverted = -1
    [joints.driver]
        type = "stepper"
        dir_pin = 21
        step_pin = 19
    [joints.endstop]
        type = "none"
        pin = 35

[[joints]]
    name = "joint_6"
    homing_direction = 1
    conversion_rate_axis_joint = 1.0
    homing_offset_rad = 0.0
    dir_inverted = -1
    speed_rad_per_s = 0.4
    [joints.driver]
        type = "stepper"
        dir_pin = 23
        step_pin = 22
    [joints.endstop]
        type = "none"
        pin = 34
Understanding the Configuration File
The arm_config.toml file plays a crucial role in setting up RiBot for your specific robot arm. This file contains various sections that define the behavior and physical characteristics of your robotic arm. Let's dive into each section to understand its purpose and configuration.
For more information on settings Library Settings Detail.
General Joint Configuration
[joint_configuration]
    speed_rad_per_s = 0.35
    steps_per_rev_motor_axis = 800 # Microstepping
    homing_direction = 1 # 1 or -1
    max_angle_rad = 7.0
    min_angle_rad = -7.0
    conversion_rate_axis_joint = 1.0
    homing_offset_rad = 0.0 # Offset from homing position
    dir_inverted = 1 # 1 or -1
This section sets the default values for all joints of the robot arm, such as speed, steps per revolution, and homing direction. These defaults apply to all joints unless overridden in the joint-specific section. Detailed explanations of these settings can be found in the [Settings Documentation](-TODO: Link to settings).
Tool Configuration
[tool]
    name = "tool"
    [tool.driver]
        type = "servo"
        pin = 27
This section configures the end-effector or tool of the robot arm, like a gripper. Here, you specify the motor type (e.g., servo) and its control pin on the ESP32. In this example, the servo motor's PWM pin is connected to pin 27.
Physical Parameters of the Arm
[arm_parameters]
# J1
    a1x= 0
    a1y= 0
    a1z= 0
# J2
    a2x= 0
    a2y= 0
    a2z= 172.48
...
This section details the physical dimensions between the joints of the robotic arm, which are critical for calculating the kinematics of the arm.
Individual Joints
Each joint of the robotic arm has its own configuration section, where you define the motor type, pins, and other specific settings.
Stepper Motor Example
[[joints]]
    ...
    [joints.driver]
        type = "stepper"
        dir_pin = 14
        step_pin = 13
    ...
Servo Motor Example
[[joints]]
    ...
    [joints.driver]
        type = "servo"
        pin = 14
    ...
Endstop Configuration
[[joints]]
    ...
    [joints.endstop]
        type = "none" # none, dummy or hall
        pin = 26
    ...
Types of endstops include 'none', 'dummy', or 'hall', with each type serving different purposes, such as setting a home position or simulating an endstop for testing.
Servo Robot Arm of 4 Degrees of Freedom
For arms with fewer degrees of freedom (like missing joints 4 and 6), you can still use the same configuration. Keep the unused joints in the file, but their configurations will be ignored. This is a somewhat experimental feature, and while general movement should work, some functionalities might be limited.
Flashing the ESP32
To flash the ESP32:
-
Connect the ESP32 via a micro-USB port.
-
On Windows, you might need to press the reset button on the ESP32 as the flashing process starts.
-
Run the following command to flash the ESP32 with the latest firmware and connect it to your Wi-Fi network and server:
python ribot.py build-esp --flash --ssid <your wifi ssid> --password <your wifi password>
After flashing, the ESP32 will attempt to connect to the server running on the same network and computer used for flashing. To change the server's IP address:
python ribot.py build-esp --flash --ssid <your wifi ssid> --password <your wifi password> --controller-host <your server ip address>
This guide should help you set up and customize RiBot for a variety of robotic arms, ensuring smooth integration and optimal functionality.